DIY rain barrels save water, money, and our planet. Learn how to build and use them in 10 easy steps.
Gardeners cherish the sound of rain, knowing it nurtures their plants and thirsty soil, particularly during dry and warm summer months.
But the rain can be a double win for your garden. You can capture it in DIY rain barrels and use it for irrigation and other purposes. You’ll need a bit of patience, a modest initial investment, and our step-by-step guide to make DIY rain barrels.
Keep reading to discover how to make every drop count.
What are rain barrels?
Rain barrels are large containers designed to efficiently capture and store rainwater from your roof, typically channeling it through downspouts. This way, rainwater that would typically run off into storm drains gets a new purpose.
These systems usually comprise a 55-gallon drum equipped with a vinyl hose, PVC couplings, and a mesh screen to filter out filth and insects, ensuring clean water collection. This simple setup makes rain barrels a practical and low-cost solution for any homeowner.

(source: https://unsplash.com/s/photos/rain-barrel)
Rain barrels effectively conserve water, reduce household utility expenses, and support eco-friendly gardening practices. You can use collected rainwater for many gardening activities, such as watering plants, maintaining soil moisture, and more.
Whether a ready-made purchase or a DIY project, a rain barrel is a valuable and sustainable addition to gardens of any size.
Benefits of using rain barrels
Rain barrels can bring many benefits to your garden and the environment:
- Cost savings: Collecting rainwater in barrels can reduce your water bill because you won’t need tap water for gardening
- Healthier for plants: Rainwater is softer than tap water, as it’s free from chemicals like chlorine and minerals like lime and calcium, making it better for watering plants and nourishing soil
- Reduces stormwater runoff: Capturing rainwater helps reduce stormwater runoff, which can contain pollutants and cause soil erosion
- Environmental impact: Rainwater eases the strain on municipal water systems and is a positive step toward sustainable living
- Drought resilience: Rain barrels provide a water source during drought, reducing dependence on restricted municipal supplies
- Landscape preservation: Using rain barrels for irrigation can help maintain the health of your landscape, preventing over-watering and water-logging
- Multipurpose water use: Rainwater from barrels is suitable for watering plants, cleaning vehicles and tools, refilling ponds, and helping with compost and lawns
- Educational and fun: Setting up and maintaining a rain barrel can be an engaging family project, offering hands-on learning about water conservation and sustainability
How to create a DIY rain barrel
As a general rule, a single 55-gallon barrel is a good starting point for a small to medium-sized garden. However, you might opt for several barrels linked together or a larger cistern if you have the space and need.
Here’s a step-by-step list for creating a rain barrel:
1. Gather materials and tools
To build a rain barrel, you’ll need the following materials:
- A large plastic barrel, typically 55 gallons
- Spigot, essential for accessing the water; choose one that’s durable and easy to operate
- Overflow valve helps manage excess water and prevent your barrel from overflowing
- Downspout diverter or flexible gutter extension for directing rainwater into the barrel
- Mesh screen to prevent debris and insects
- Waterproof sealant to ensure the system is leak-proof
You’ll also need the following tools:
- Drill with bits for making holes
- Hacksaw for cutting
- Teflon tape for sealing threaded connections
- Hose for watering
- Optional: Stand for elevation for better water pressure
Note: Ensure the materials are sturdy and suitable for outdoor use.
2. Prepare the barrel
- Thoroughly clean the barrel to remove any residues or contaminants, especially if it’s repurposed.
- Drill a hole for a spigot near the barrel’s bottom. The hole should be slightly smaller than the spigot’s diameter to ensure a tight fit.
- Drill a second hole at the top of the barrel for the overflow valve. Make sure to position this hole in a way that safely diverts excess water away when the barrel fills up to this point.
Getting the positioning right will help avoid water spilling over and potentially damaging the area around the barrel.
3. Install the spigot
Installing the spigot involves a few careful steps:
- Wrap Teflon tape around the spigot’s threads; this helps create a waterproof seal and prevents leaks.
- Insert the spigot into the previously drilled hole at the bottom of the barrel. It may require some force to ensure a snug fit. Once in place, secure it from the inside, either by hand-tightening or using a suitable tool, depending on the spigot’s design.
You must firmly fix the spigot to avoid wobbling or leaking, which can compromise the system’s efficiency.
4. Set up overflow valve
- Place the valve in the hole drilled at the top of the barrel. It will redirect water once the barrel is full, preventing overflows that could damage the barrel or the surrounding area.
- Secure it firmly to ensure a watertight seal.
- Consider attaching a hose or a pipe to the valve to direct the overflow water to a desired location, such as a garden bed or a drain, which helps manage water and reduces soil erosion near the barrel.
5. Attach mesh screen
- Cut the mesh to fit over the top opening of the barrel. It should cover the entire opening to be effective.
- Secure the screen with a waterproof and rust-proof material to keep it in place. A mesh screen will help maintain the quality of the collected water, preventing clogs in the spigot and avoiding mosquito breeding.
6. Connect to downspout
- Place the barrel in a chosen location under a downspout.
- Use the downspout diverter or a flexible gutter extension to direct rainwater from the roof into the barrel. The connection should be snug and secure to prevent leaks.
- Ensure the diverter or extension is properly aligned with the barrel’s top opening for optimal water collection. This setup will maximize the amount of rainwater you can harvest.
7. Install the rain barrel stand
- Elevating the rain barrel on a stand is an optional but beneficial step. A stand increases the gravity-fed pressure, which can be helpful for watering. You can use cinder blocks, a wooden frame, or any sturdy, level platform.
- Make sure the stand can safely support the full weight of the barrel when it’s filled with water, which can be quite heavy.
- Place the barrel on the stand securely to ensure it won’t tip over.
8. Seal and secure
Once you assemble all the parts, seal and secure everything.
- Apply waterproof sealant around the spigot and overflow valve to prevent leaks.
- Check all connections to make sure they are tight and secure.
- Allow sufficient time for the sealant to dry completely before testing the system.
9. Test the system
Before using the barrel, conduct a thorough test:
- Fill the barrel with a hose to check for leaks around the spigot, overflow valve, and any other connections.
- Observe the overflow system in action to ensure it directs water away as intended.
- Address any issues before using the barrel, ensuring it operates efficiently and effectively.
How to use rain barrels for drip irrigation?
Integrating rain barrels with a drip irrigation system is an excellent way to water your garden efficiently. Here’s how to set it up:
- Place your rain barrel in an elevated spot to get better water pressure from gravity.
- Attach a garden or drip irrigation hose to the barrel’s spigot. Ensure the connection is secure and leak-free.
- If your barrel does not have elevation or your garden layout necessitates it, employing a small water pump will boost water pressure for the drip lines.
- Arrange your drip irrigation lines throughout the garden, ensuring they reach all plants.
- Add a pressure regulator to keep the water flow consistent and appropriate.
- Set up a timer to automate the irrigation, providing regular and consistent watering.
- Place drip emitters or soaker hoses to water plants based on their needs and adjust as needed.
- Regularly inspect the system for leaks, clogs in the emitters, and the pump and timer’s functionality.
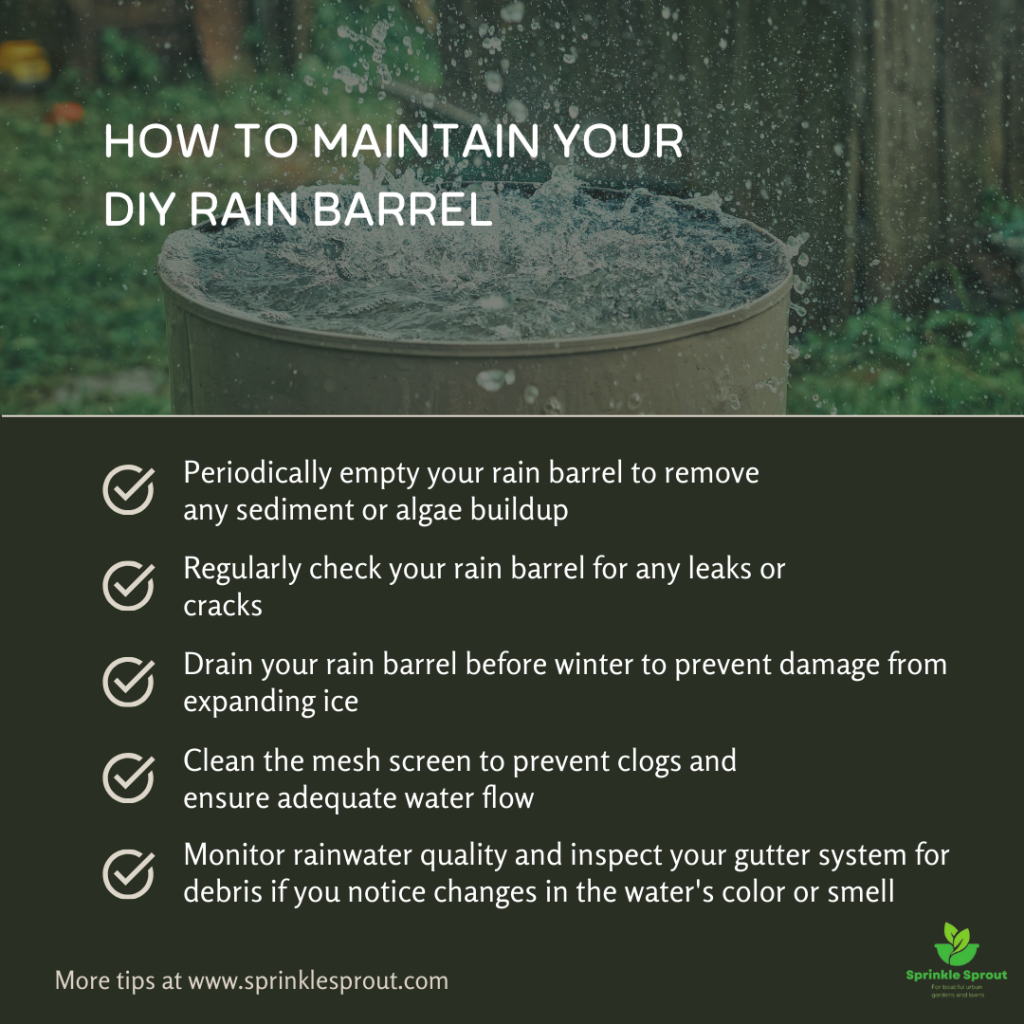
Rain barrel maintenance tips
By following these maintenance tips, your rain barrel will remain a reliable and valuable resource for your garden for years to come. Regular upkeep not only ensures efficiency but also helps in providing your plants with clean, safe water.
- Regular cleaning: Periodically empty your rain barrel to remove any sediment or algae buildup. Use a mild detergent or vinegar solution and thoroughly rinse the barrel.
- Inspect for leaks: Regularly check your rain barrel for any leaks or cracks, especially around the spigot and overflow valve. Repair any damage promptly to maintain its functionality.
- Winter care: If you live in an area with freezing temperatures, drain your rain barrel before winter to prevent damage from expanding ice. Store it upside down or in a garage to protect it from the elements.
- Screen maintenance: Clean the mesh screen to prevent clogs and ensure adequate water flow. Replace the mesh screen if it damages or becomes worn out.
- Check for mosquitoes: To prevent mosquitoes from breeding, ensure the mesh screen is intact and consider adding a mosquito dunk (a safe, non-toxic product) to the water if necessary.
- Monitor water quality: You can test rainwater using an electronic test meter. If you suspect it’s contaminated, send rainfall samples to a lab. Test your water‘s pH, conductivity, turbidity, TSS, TC, FC, nitrate, nitrite, DOC, and metals to check for purity and contents. Clean the barrel and inspect your gutter system for debris if you notice changes in the water’s color or smell.
Make every drop count with rain barrels
Creating and using DIY rain barrels is a simple yet impactful step towards sustainable living. Don’t wait to make a positive change; start building your rain barrel today and contribute to a greener future. Remember, every effort counts in conserving our precious water resources.